Learning how to fit a caravan motor mover is a big step toward easier manoeuvring and less stress on tight driveways or campsites. A motor mover takes the effort out of positioning your caravan by driving the wheels using powered rollers controlled by a handset.
This guide explains the full installation process in plain terms, from choosing the right location to fitting brackets, connecting cables, and testing the mover so it operates smoothly and safely.
Fitting a caravan motor mover can be a DIY job if you are confident working under the van and following instructions carefully. The advantage of DIY installation is cost saving and understanding how your system works. That said, the job involves working near wheels, axles, and electrical connections, so it must be done properly.
If you are unsure at any point, stop and seek advice. Incorrect fitting can affect traction, safety, and the life of the mover.
Having everything ready makes the installation much easier. Make sure the caravan is parked on firm, level ground before starting. You will usually need:
Safety comes first when working under the van.
Never rely on a jack alone. The van must be stable before you crawl underneath.
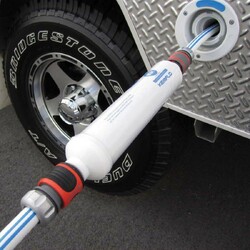
Correct positioning is critical for good traction and smooth rolling. Most movers mount to the caravan chassis near the axle so the rollers can press against the tyres. The motors usually sit one on each side of the van. When positioning:
Take your time here. Getting the position right makes the rest of the job easier.
The brackets clamp or bolt to the chassis and hold the motors in place. Most modern kits avoid drilling, but always follow the instructions supplied with your mover.
Once the brackets are fitted, the motors can be mounted.
The rollers must engage the tyres evenly, otherwise the mover can slip or strain under load.
The control box manages power and signals between the battery, motors, and controller. Choose a location that is:
Mount the control box securely to the chassis or inside a sealed compartment. Keep it neat and away from moving parts.
This step requires care and attention to detail.
Before testing, make final adjustments.
Testing confirms the installation is correct.
Most problems with a caravan motor mover can be traced back to a few avoidable setup mistakes. These issues often do not show up straight away, but they can affect traction, battery performance, and long term reliability once the mover is under load.
Skipping careful measurement and positioning
If the mover is not positioned correctly on the chassis, the rollers may not contact the tyres evenly. This can reduce traction and cause the motors to work harder than they should.
Mounting motors unevenly side to side
Both motors need to be installed the same way on each side of the caravan. Even small differences in height or alignment can cause uneven movement, strain on components, or poor control when turning.
Poor cable routing or loose connections
Cables that are not secured neatly can rub on the chassis or hang low, increasing the risk of damage. Loose electrical connections can also limit power delivery and shorten component life.
Incorrect roller gap to tyres
If the rollers sit too far from the tyres, the mover may slip. If they are too close, it can create unnecessary resistance and wear. Always set the gap exactly as specified in the manufacturer’s instructions.
Rushing the installation
Trying to finish the job quickly often leads to missed checks or uneven tightening. Taking your time helps ensure everything is fitted properly and safely the first time.
Fitting a caravan mover makes moving your van easier and safer, especially in tight spaces. When installed correctly, a mover gives you confidence and control without strain.
If you are unsure which motor mover suits your caravan, or you want advice before you install, browse our range or share your caravan details with us. We are happy to help you choose the right mover and get set up properly.

Add your favourites to cart

Select Afterpay at checkout

Log into or create your Afterpay account, with instant approval decision

Your purchase will be split into 4 payments, payable every 2 weeks
All you need to apply is to have a debit or credit card, to be over 18 years of age, and to be a resident of country offering Afterpay
Late fees and additional eligibility criteria apply. The first payment may be due at the time of purchase
For complete terms visit afterpay.com/terms